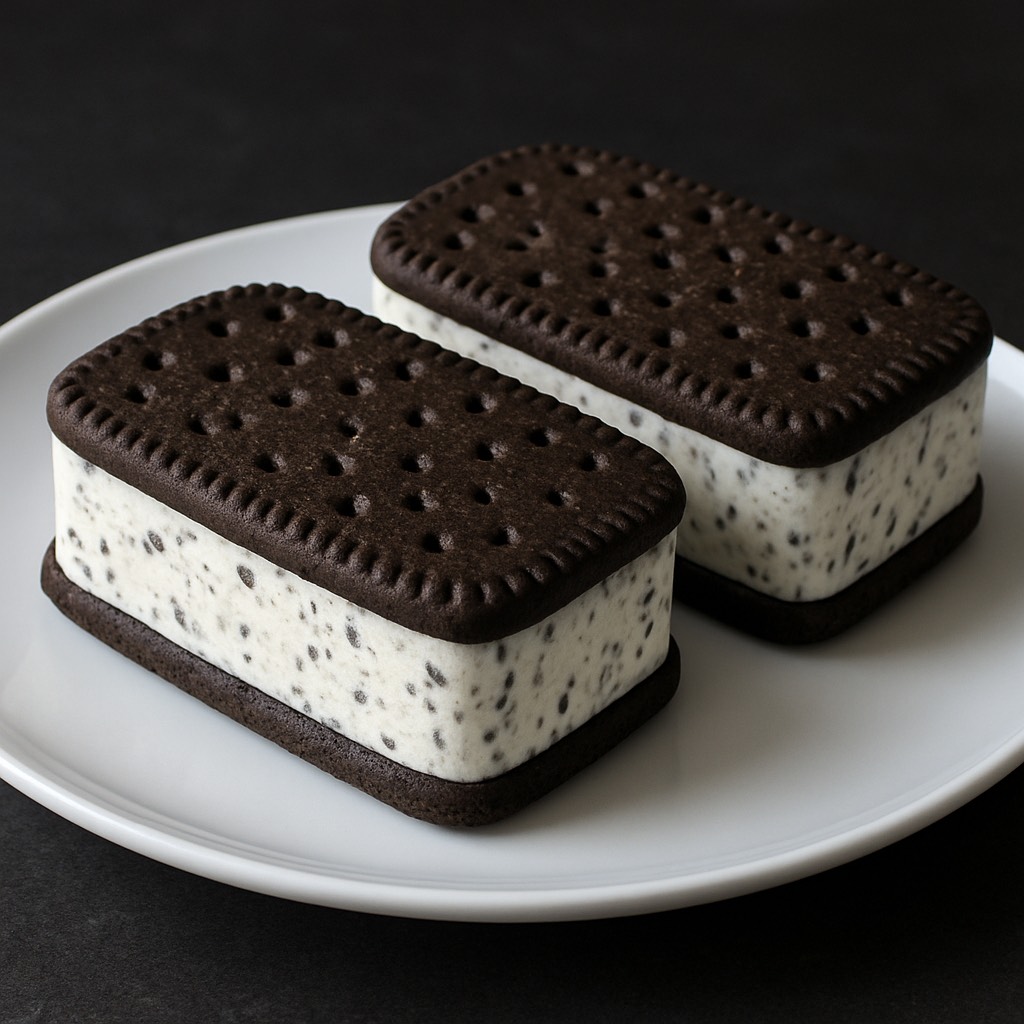
Cookies & cream is that classic flavor that never misses. Now imagine it in bar form — dipped in chocolate, packed with crunchy cookie pieces, and perfectly creamy. These homemade Cookies & Cream Ice Cream Bars are ridiculously easy to make, even without an ice cream maker. They’re fun, aesthetic, and the kind of dessert that makes you feel like you just pulled a secret menu item from your freezer.
If you’ve been looking for a cold treat that hits the nostalgia button while still giving homemade charm, this is it. These bars are perfect for summer get-togethers, cozy nights in, or when you just want to flex your dessert-making skills without turning on the oven.
Ingredients You’ll Need
- 3 cups vanilla ice cream (let it sit out to soften)
- 1 cup crushed chocolate sandwich cookies (Oreos or any brand you love)
- 1 ½ cups chocolate chips (semi-sweet or dark for balance)
- 1 tablespoon coconut oil or vegetable oil (helps the chocolate melt smooth and glossy)
- Popsicle sticks or small wooden sticks
- Parchment paper
How to Make Cookies & Cream Ice Cream Bars
Step 1: Mix It All Together
Start by softening your vanilla ice cream just enough so it’s easy to mix — about 10-15 minutes at room temperature. In a large mixing bowl, fold in the crushed cookies. The more rustic the cookie pieces, the better. You want every bite to have texture — not just cookie dust.
Step 2: Press Into a Pan
Line an 8×8 inch pan with parchment paper, leaving a bit of overhang on the sides so you can easily lift the ice cream slab later. Pour your ice cream and cookie mixture into the pan and spread it evenly. Take a spatula and press it down gently to smooth the top — this helps it freeze evenly.
Step 3: Freeze Until Solid
Place the pan in your freezer and let it set for at least 4 hours or overnight if you want it super firm. Don’t rush this step; you want it to hold its shape when you cut into it.
Step 4: Slice Into Bars & Add Sticks
Once the ice cream is fully frozen, lift it out of the pan using the parchment handles. Cut it into rectangular or square bars — go as big or small as you like. Quickly insert a popsicle stick into the center of each bar. Work fast here because the ice cream will start to soften. Once all your sticks are in, pop them back in the freezer for 30 more minutes.
Step 5: Melt & Dip in Chocolate
While the bars firm up again, melt your chocolate chips with the coconut oil. Use a microwave in 30-second intervals, stirring between each, until fully melted and smooth. You want the chocolate glossy and pourable.
Dip each frozen bar into the chocolate, using a spoon to coat the sides if needed. Let any excess chocolate drip off before placing the bar on a parchment-lined tray. For extra flair, sprinkle crushed cookies on top while the chocolate is still wet.
Step 6: Final Freeze
Once all the bars are coated, freeze them again for 1-2 hours to let the chocolate harden completely. After that, they’re ready to eat whenever you want!
Tips for the Best Ice Cream Bars
- Work quickly: Once you start cutting and dipping, the ice cream will soften. Freeze between steps if needed to keep everything sturdy.
- Flavor boost: Mix in a bit of crushed pretzels or toffee bits with the cookies for an extra crunch and salty balance.
- Different chocolates: Switch up the chocolate coating — white chocolate for a sweeter, creamier finish, or milk chocolate for a classic vibe.
- Storage: Store these in an airtight container with parchment paper between layers to keep them from sticking together.
Why You’ll Love These
These ice cream bars give you the best of both worlds — the creaminess of ice cream and the satisfying crunch of chocolate and cookies. Plus, they’re customizable. Swap the vanilla ice cream for chocolate, or add a swirl of caramel sauce inside the mix. They’re also a fun treat to make with friends, family, or kids.
They’re way more impressive than just scooping ice cream into a cone — yet still super easy to pull off with basic kitchen tools.
Final Thoughts
There’s something about cookies & cream that just feels like comfort in dessert form. And when you can make that into a handheld frozen bar, coated in rich chocolate? You’ve basically won dessert. Keep these stocked in your freezer and thank yourself later — they’re that good.
Stick around—every visit tastes better than the last at The Buttered Bliss.
Related Posts